Showing posts with label aesthetic. Show all posts

Sunday, April 7, 2013

Hidden Artist Strikes Again


I started with this-a 1949 cover for the Saturday Evening Post painted by Norman Rockwell


After I did my camera and photographer twisting and twirling I loaded the image into RT using the POP  profile.  This new addition to RT uses tonemapping and CIECAM02 to add, surprise, surprise, pop to your image.

To prevent one problem, jet black splotches that appear in highly over exposed areas when tonemapping and CIECAM02 are used together, Jacques, the developer who added CIECAN02 to our toolkit (applause, applause) made changes recently.  He compressed the highlights for well exposed images taken with bright scene illumination, the highlighted value of 2000 standard candles per meter squared.

 While that fixed one problem it added a second. For less well laminated scenes like indoor scenes with over exposed vistas viewed through windows, or like the low illumination I used to create this image, the histograms never go above 75%.  White areas end up too grey.

 The fix is blindingly obvious if you understand the intricate working of CIECAM02. You adjust the scene illumination slider to match the image. The histogram moves to the right; you stop when it starts to clip.  But the rest of us who think a standard candle is the long thin one you push into a brass candle stick we tend to miss what's needed to be done.

Yesterday afternoon I discovered that undocumented fix. Not by some brilliance on my part. In a not-so-secret forum where RT developers hang out and talk RT programming talk, this was being discussed in issue 1827. So last night, me, a lowly user, dared to tell Jacques, the developer, that his technically correct tool tip needed to be rewritten. In the middle of our night and his morning-the time difference between Wisconsin and France-Jacques wrote back saying of course he would do it

Took less than 8 hours. So if any users of commercial programs such as Lightroom happen to stumble over this blog please put in a request for the perfect fix you've been waiting to use. Then let us know how many weeks/months/years/eons it takes to get an answer back. RAWTherapee might bring on slider shock and have its quirks, but its developers listen. And when it rocks, it Rocks!

EDIT.  An Oops. Or semi Oops. What was less than blindingly obvious when I wrote this was that the real  cause of the problem was a bug in the CIECAM02  calculations. With build 4.0.10.69 that has been fixed, the problem no longer exist and the histograms no longer hang up at 75 percent no matter where you set the illumination slider.


A two slider adjustment in scene illumination and exposure moved the red channel to the clipping point and lightened the image.


A CIECAM02 contrast boost darkened the edges and clipped the red channel

.
A wild LAB custom CC curve made big changes to the image and brought all the channels together. Not the usual way to set a white balance.
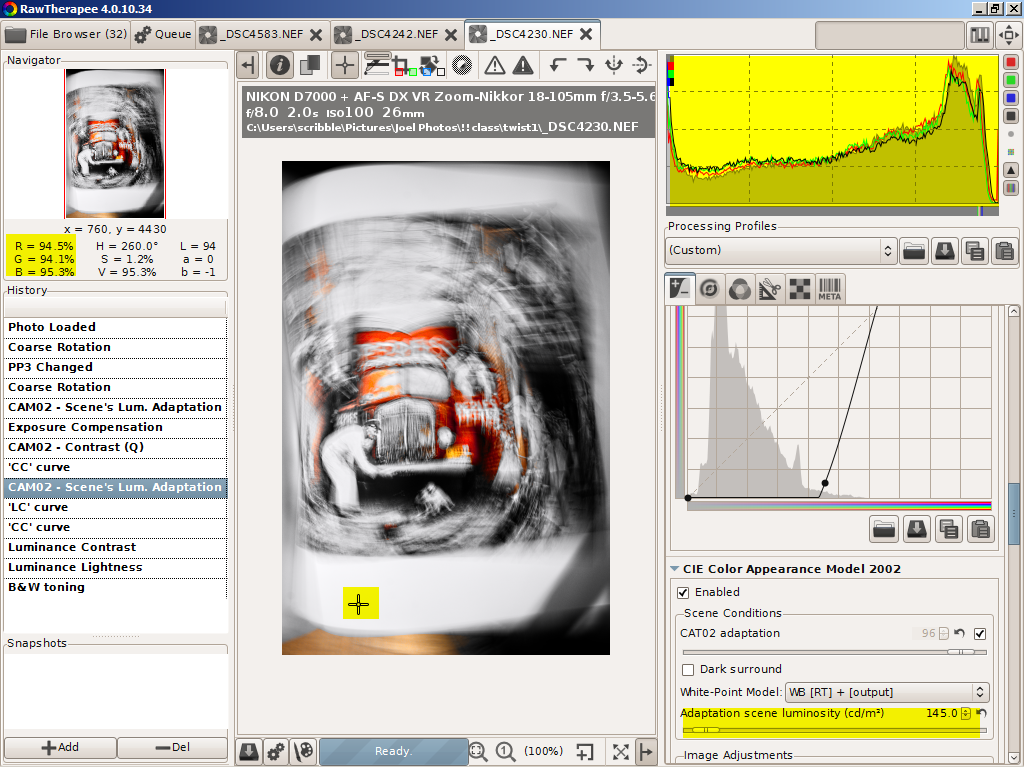


A final scene illumination of 145 cd/m2 sets the overall image whiteness.


Two curve and slider adjustments didn't change the image that much. Running the chromaticity to the max, however, gave me a wild effect I could use.


The final masterpiece ready to be printed and matted for the masterclass.


And because it is also neat the black and white version created by clicking  BW tone mapping in the LAB section.

Saturday, March 30, 2013

The Artist Hidden Within

I'm taking a master class on how to drag the 'artist hidden within' out into the daylight. So for the next several weeks that hidden artist will be raising his sarky head and inflicting his 'masterpieces' upon the innocent blogosphere.

As any regular reader of this blog knows, the non hidden artist's aesthetic tends towards photographic perfection, the sort you pixel peek at 100% or higher to see. Accurate colors, perfect sharpness, noise freedom has reigned here.

The hidden artist, on the other hand, favors this.


The original Playboy style image that posed for the 'artist within' is from a 40 year old Petersen's Master of Contemporary Photography book about Bert Stern.  If the name Bert Stern isn't instantaneously recognizable  he's the photographer whose 1950's ads turned vodka, then a cold war Russian commie pinko exotic, into an all American drink. This really dry vodka martini ad was worth $4000 plus travel expenses in 1955 bucks. If his reputation has slipped a little since then he lived very well in his time.


Enough dry history. Here is the 'hidden artist's' RT workflow.

First select a colorful page or double page image to mangle. Set the camera to manual, to ISO100 or lower, to between 2 to 10 sec exposure and to whatever iris opening gives a reasonable photo. Move camera while snapping the photo. Better yet, twist, roll and yaw the photographer while snapping  the photo. Since you will have no idea what you have on the card, do this a dozen or more times. Load  the most interesting photo into RAWTherapee. Or in this case, one that didn't violate Blogspot's prohibition of full frontal nudity. Finally start the masterpiece making.


This brought out the color in the wide tie, the subject of the photo.


A hue slider adjustment that shifted the colors towards green. The CIECAM02 algorithm is 'all'.


Playing around with the CIECAM02 sliders brought us to this color mixture.


Since the colors aren't changing much 'the artist within'  turned this into a tiff file. Then he loaded that back into RT for further processing.


This lighten the background.


With this 'the artist within' laid down his mouse.  And left it to 'the outer guy' to write this blog post. He liked this version the best.


RAWTherapee 4.0.10.36 is now here. Besides speedups and bug fixes, it offers a new set of packaged profiles and two new demosaicing algorithms intended  for use with HighISO images. (Big Grin)

http://www.visualbakery.com/RawTherapee/Downloads.aspx

Thursday, March 7, 2013

Kindergarten Snow Day---Another Quickie Workflow


The history of this less than impressive image started with flickr mail about non CPU manual lenses. I had accumulated a collection from garage sales, Craig's lists and on-line non ebay auction sites back when I was shooting with a Nikon D60. One lens was an Osawa 300mm f5.5. 

If I remember right curiosity drove that purchase.  Osawa?  Never heard the name. What kind of lens was that?  Osawa turned out to be a short lived 35mm camera maker from the 1970's. But a decent lens maker who, last time I googled, was still making lens for medium format cameras.

The lens did not disappoint and became part of my D60 kit. I posted some shots on flickr but when I bought the D7000 the lens was packed away and eventually buried under other boxes of good junk being sorted. Wife has ordered what threatens to turn into a massive Spring cleaning.  So when I received the email from another Nikon lens collector asking how it worked on a D7000, I had to find it. Which delayed any lens testing to the day of the latest Midwest mini-blizzard. 

The test target was house a hundred yards away from an upstairs bedroom window. The test was: yes the Osawa mounted and yes it took pictures. The fact that kids enjoying a snow day from kindergarten  wandered into the image part of frame and a hunk of out of focus curtain half filled the rest was coincidental. That the image ended up on my computer along with a directory full of more important shots was equally coincidental. That it wasn't immediately stripped down to loose pixels and tossed away into the reject bucket wasn't coincidental.

Recently I've been reading about photographic history and aesthetics.  The super sharp, noise free, tonally perfect aesthetic embraced by most of us RT users--why else would we put up with this many check boxes and sliders and even demand more -- can be traced back to photographers like Ansel Adams and Edward Weston. Both spent inordinate amount of time and effort in the darkroom producing perfect prints. But there were other aesthetics: the pictorialism of Stieglitz's Camera Works, the abstractions of Minor White's early Aperture, the photo montages of Rodchenko revolutionary posters--and so on.

 Let's call this an example of  Scribble's ...Colorism.


An auto levels exposure correction. If I had wanted to go for an Ansel Adams Zone System tonality I would use the black point slider to expand the histogram to fill the empty left section.


As good a time as any to crop. Since a square frame worked I fixed the ratio and invoked the rule of thirds. The big difference in the histogram came from cropping out the curtain.


A white balance in a snow scene is always a good idea even though in this image it didn't make much of a difference.


Now the Colorism created with CIECAM02.  The Contrast (up) and Brightness (down)  moved the snow into the unclipped but close to pure white area of the histogram.  The Colorfulness slider fully colorized our models, human and canine, and gave the image its snap.


Now a mini confession. My first workflow wasn't as quick and clean as this tutorials claims. I played around with slider and curve combinations, made a bunch of jpgs, sent one off to flickr and even collected a comment among the views. Wasn't til the end of the mini-blizzard and the snow blowing was over that I decided this might be worth a tutorial. So I duplicated the settings from memory.  And ended up liking my first version better.

A hint. If you ever need to duplicate an image or workflow and find yourself mentally kicking yourself  for not saving a profile, load the pp3 file of your good jpg into notepad and duplicate the settings. That will usually get you back to where you've been before.

Not my usual image but --sometimes you have to go wild and live dangerously.