Showing posts with label wavelet. Show all posts

Thursday, September 20, 2012

Teen with Fedora--A Second 'First Look'

In my original post on  RAW Therapee's new noise reduction routines I had excellent results with the image of Charlotte under Lord Shiva but far worse results with some other images. The noise reduction part still worked but thick black vertical lines appeared in the converted.images.

Turns out the noise reduction algorithm broke the image into segments called tiles. It worked its noise reduction magic on each tile individually but sometimes the tiles didn't rejoin smoothly. A tricky and hard to find bug, judging from the number of posts that appeared in the forum while they were fixing the problem.

That bug has been mostly swatted--noise reduction still doesn't work on JPGs-- but with code change set 135 we can now test and work with RAW files.  ( found at http://www.visualbakery.com/RawTherapee/Downloads.aspx  )


ISO 6400  f8.0  1/25 sec  EV -0.7

This snap was taken at Old World Wisconsin in the back of a barn during a demonstration of 19th century cow milking.  The lighting wasn't insanely difficult but as you can see from the camera settings I was pushing my D7000 to get this shot.

So how did RT do when I tried to improve the image.


YUP!  RT noise reduction works,

The noisy image to the left is without any noise reduction, just a +0.7 exposure correction to compensate for the -0.7 correction I did in the camera to move the shutter speed up to 1/25 of a second. The NR settings of the much cleaner image on the left are shown below.
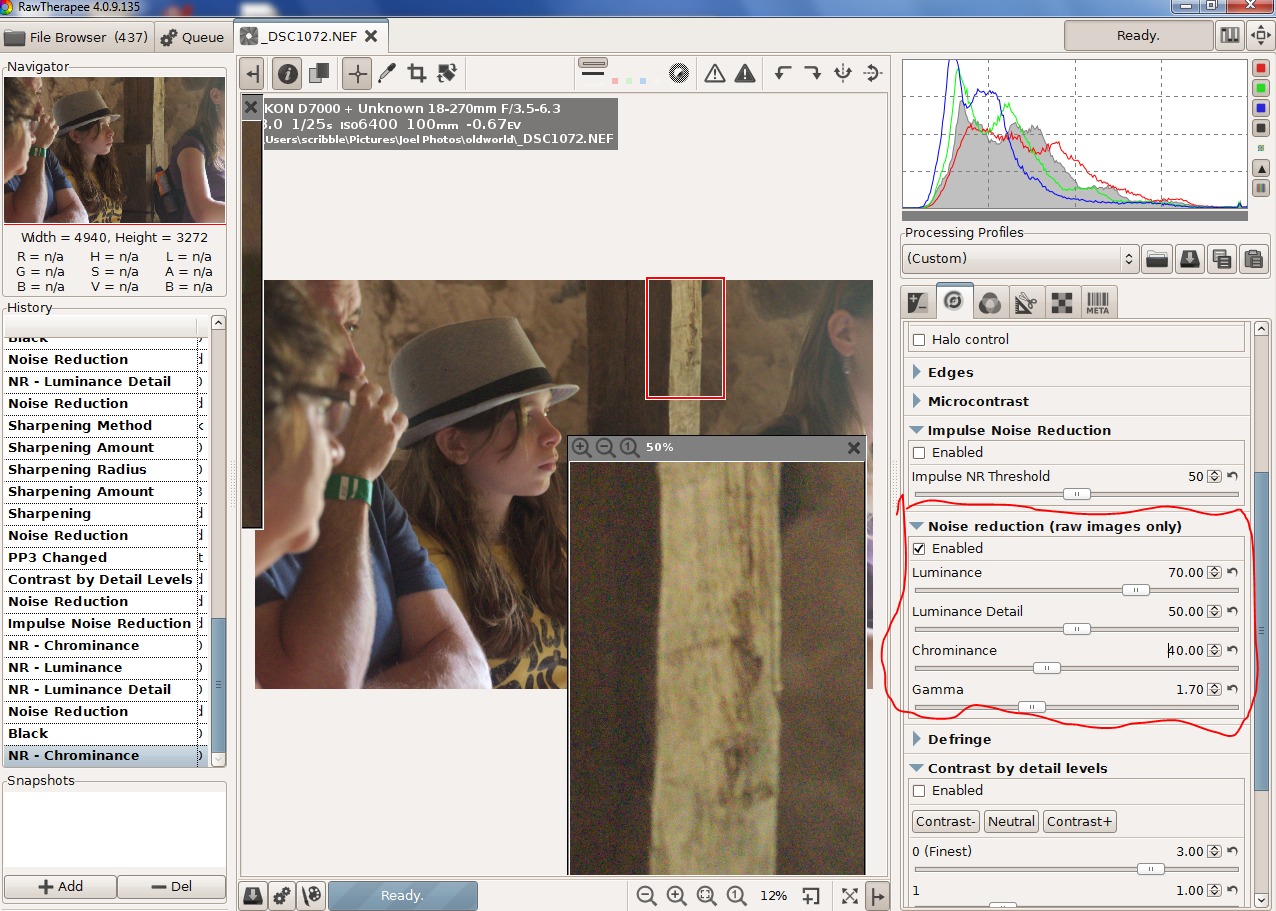


I adjusted the Chrominance slider first. Use a 400 % box on something with little detail like the girl's cheek. Find a setting where all the color speckles disappear and then add a bit more.  This slider works on the A and B LAB channels that only contain low resolution color information so you are not blurring detail. With my D7000 at ISO 6400 about 2/3 of the noise was chromatic so that was a no fiddling around adjustment. Nice


For the other two sliders I picked a region with fine detail, the wood grain on the 2x4, and adjusted them to match the detail in my conversion to the detail in the jpg out of the camera. The Luminance slider controls the strength of the noise reduction. The Luminance Detail slider sets the threshold on  another algorithm that does its best to seperate real detail from random noise.  In this image Luminance 70 and Luminance Detail 50 worked well.


So where are we at now.  The left top line profile is from a RT conversion with no noise reduction.
The one below that is from the camera's jpg where I used the D7000's normal noise reduction setting.  It also is very close to the noise I measured when I used RT's default settings.

The top right profile is from my detail preserving image.  And finally the insanely low noise ISO 6400 profile below it is from when I went all out with a Luminance of 90 and a Luminance Detail of 6 to see how low noise I could go.

How bad was that image.  When I displayed it side by side with my tuned image I didn't have to pixel peek hard to see I had lost detail.  But if I had emailed it to Fedora Girl I'm sure she wouldn't have screamed "WHERE IS MY DETAIL" and immediately sent it into the bit bucket. We RT users are after the very best quality but in this world drowning in imagery, I'm afraid most viewer don't notice.

So great job RT folks and especially Emil who designed the algorithms and did the coding.


Monday, July 16, 2012

First Look--RAWTherapee's New Noise Reduction

Last Wednesday during this hottest on record Midwest heat wave Charlotte and her Mom and I drove in air conditioned comfort  to tour Charlotte's favorite museum, the Milwaukee Public. There Charlotte became my guide. My Nikon D7000 hanging around my neck, she led me from exhibit to exhibit.

Excellent exhibits, I'll admit. But from a low light, hand held photographer's point of view, the trip was not a successs. The lighting, or lack of it, was the pits. Still, I snapped away and came home with a few GB's of images, hoping for some lucky shots.

What I discovered when I went to process the RAWs wasn't luck exactly. I've been following the development of RT's new noise reduction routines for over a year and I check their forum regularly. The developer's denoise compile I downloaded isn't bug free and only works with 64bit Win7, but with my new computer its match with my museum snaps was perfect.


This snap was taken at a 1/4 sec and ISO2500.  Charlotte held her pose. Image stabilization and I held the camera steady. After a 2 EV boast in exposure and a tone curve, it's a decent image to see how well RT's latest and greatest works. There is no manual entry yet but the routine turned out to be more automated than I expected and easy to work out.


The luminance slider sets the maximum strength of the noise reduction; the luminance detail slider sets how much of that maximum strength is actually used. At a detail setting of 100, no or very little noise reduction is applied. At 5 and with a strength of 20--the settings I used here--the noise reduction was both artifact free and very impressive. But I was clearly losing detail as you can see in comparison with an image with no noise reduction (right)  below


I'd gone too far. Below is a tuned version where I tried to preserve detail.


I kept the luminance setting at 20 but ran the detail slider up 60, added more unsharp mask sharpening and set the gamma to 1.4 to bias the noise reduction towards the shadows. Below is another comparison with the no noise reduction image. Beside being significantly less noisy the tuned image shows as much and perhaps even more detail than the no noise reduction image. Click on the image and go to the original size if you want a better view.

 (note--if you download this build from http://dl.free.fr/getfile.pl?file=/unoeMxPZ RL convolution sharpening is broken, When you process an image in the queue the software grabs all the available memory and crashes when it can not find more.)


To finish off this first look here are the respective noise profiles--05 detail on the top, tuned detail in the middle and no noise reduction on the bottom.


While this is not the released version and there are still some bugs to work out, I'm  very impressed. So congratulations to everyone involved.