Showing posts with label ISO6400. Show all posts

Wednesday, June 5, 2013

Noisewise, Is My Camera Meeting Spec?

Noise spec? you ask.  Point to where that is printed on the camera's spec sheet, you demand.  Sorry, camera manufacturers don't  spec their noise or more accurately their signal to noise ratios. Why? Maybe it's because some of us meany pixel peepers might take the number seriously and start demanding refunds. Or, to be more charitable, it might be because accurately measuring a camera's S/N ratio takes more than a look at a computer screen?

Physics-wise, S/N ratios are complicated. Photon shot noise, addition in quadrature, Poisson  statistics--those sort of things. Complications on top of complications.

A more reasonable question would be "Is my camera as good as the camera that was used  to take the photos for the review I read on my favorite photo site? The one that convinced me to buy the camera?"

If you are lucky, yes. More likely, no. Any marketing manager worth his corner office will make sure the cameras sent to review sites were hand picked for performance. But your camera should be close or you do have the right to demand your pixel peepin' refund.

This came up in the forums recently. A new user had bought a 'bridge' camera or, as I used to call them before marketing folks invented the name, a super zoom.  Those types of cameras have little sensors since, among other things, their light weight and inexpensive super zoom lenses only make little circles of focused light. Since they also pack about 12 megapixels into their little sensor--lets say the trade offs are not favoring S/N ratios and low light performance.

Our new user picked the right place to fix his noise problems even though his expectations were originally too high. RawTherapee has great noise reduction tools but there are limitations. So a question came up. Was his camera's S/N ratio within 'spec'?

Here is the workflow I used to work out the answer by using a comparison image, RawTherapee and ImageJ

I've already posted a tutorial on how to create a noise profile in ImageJ so I won't repeat the steps here.  http://scribble-jpc.blogspot.com/2013/03/crreating-noise-profiles.html

Imaging Resource is the place to go for your comparison images. http://www.imaging-resource.com/ They have created a massive data base of reference images going back to the days when a 2 megapixel camera equaled a $1000 investment. And they did things right from the start, controlling details, such as consistent lighting, needed to create reference images that highlight real differences between individual camera brands.

To download your comparison image pick your camera in the review pages, go to the sample tab and then the sample image page.


Near bottom and after a multitude of jpg images you will find Raw downloads of their multi-image test shot taken with your camera's various ISO settings. It has the Macbeth color chart we will use. I downloaded the ISO6400 version  to compare it with  the bowling alley picture I blogged about earlier.
 http://scribble-jpc.blogspot.com/2013/03/shoot-at-iso21000-print-at-30-by-45.html


Using the neutral profile I converted both NEFs  into jpgs before loading them into ImageJ. That conversion insures I was doing a real apples to apples experiment. If your camera doesn't take RAW files, obviously you must use jpgs but then your test image must have been taken with the same setting as the reference image for any meaningful results.


Pick the closest match you can find on your image, the wall behind Rhianna, and on the Imaging Resouces' multi image, the #4 gray scale box.  Run your profiles. Compare the graphs.

That's it. Twenty minutes time max and you know how well your camera is working. Take a few more measurement, let ImageJ do the signal averaging and you have an accurate S/N number.  Then you can brag about your new camera's performance in the forums. Or. more important, toss down a hard copy on the service desk if your camera needs fixing.

As for the new user who just posted his "Thanks" -- "You're more than welcome since your questions inspired this tutorial."

You can find RawTherapee 4.0.11.1 here. The package includes an updated manual

http://rawtherapee.com/blog/rawtherapee-4.0.11-released


Friday, March 8, 2013

It's Here!! RAWTherapee 4.0.10


No Noise Reduction


The new LAB noise reduction with its speed ups and individual noise channel controls.

Need I say anything more?  Yup. Great job RT folks!!

Find RAWTherapee  4.0.10.1 here

http://www.visualbakery.com/RawTherapee/Downloads.aspx

Monday, January 14, 2013

CIECAM02 What IS IT?

If everything goes as planned and everything on the to-do list is checked off the  next stable build, RT 4.1, will be posted in early February. That build promises mucho minor bug fixes, welcome speedups and CIECAM02.

So what is RAWTherapee's latest and greatest addition.  If you google CIECAM02 the wiki entry pops up at the top of the list. If you understand what you read there, email me a translation in people talk. You obviously understand what going on far better than I do. Tis a confusing topic.

In the RAWTherapee implementation we are looking at 12 different sliders coupled with three curve sets and  five curve types. So I will state upfront that if you are looking for a blog about adjusting this slider to create exactly that effect look somewhere else.  I'm not even close to working out those details. But I will say by dragging  sliders around without knowing  exactly what will happen I've corrected many color problems. I've also seen interesting tone mapped HDR images in the developer's forum.  for examples go to http://imgur.com/a/yqzLm#0

With a total of 12 sliders and 5 curves types  CIECAM02 corrects the subtle and not so subtle differences in how we humans see a scene or image and how cameras makes an image. The most obvious difference is chromatic constant or in photographer talk white balance. Another effect, seen by anyone who has thumbed through an optical illusion book, is what wiki calls the white illusion. Both grey patches are identical but they look different when displayed against white or black backgrounds
.


The  'scene condition' section deals with these effects. To quote wiki 'Though the human visual system generally does maintain constant perceived color under different lighting, there are situations where the relative brightness of two different stimuli will appear reversed at different illuminance levels. For example, the bright yellow petals of flowers will appear dark compared to the green leaves in dim light while the opposite is true during the day. This is known as the  Purkinje effect, and arises because the peak sensitivity of the human eye shifts toward the blue end of the spectrum at lower light levels.'

The top slider makes only minor adjustments to the histogram. I check the auto adjustment box in the corner.  With the dark surround--for example viewing a  framed photo hung in a dark hallway-- the change is more pronounced. To counter the Punkinje effect, it shifts the blue channel in the histogram. There are two algorithms for this, the first using only the normal RT adjustments with the second factoring in the CIECAM02 adjustments.


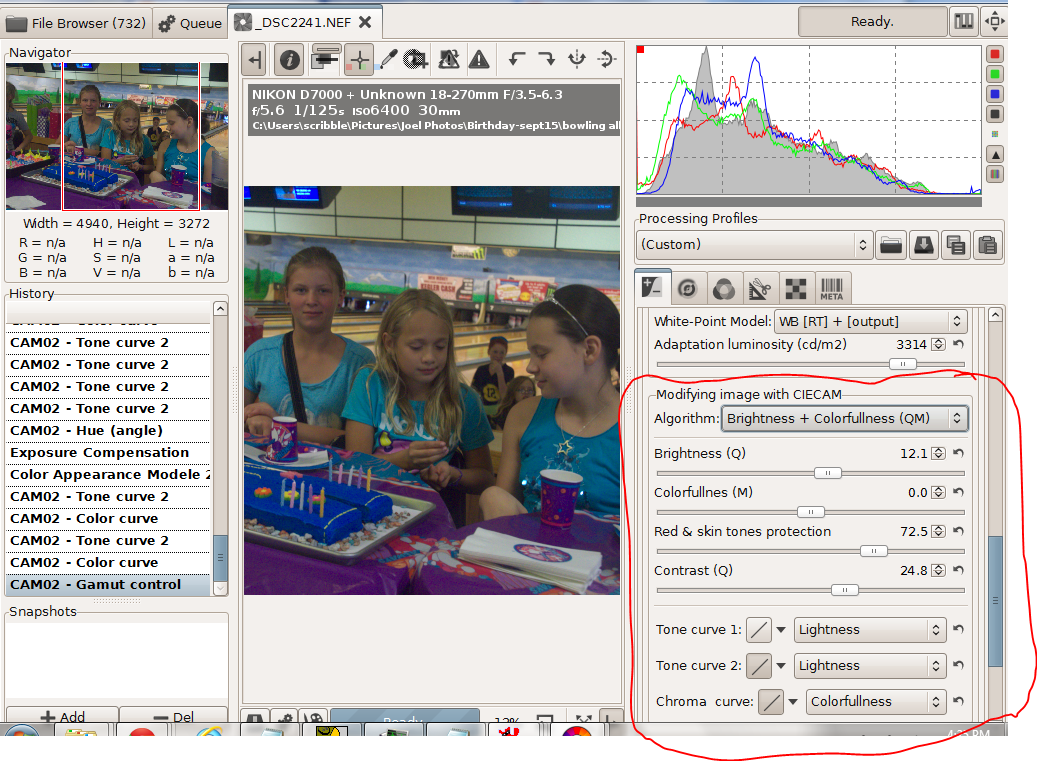
 In the next section there are 9 different sliders if I show them all.


Since I did the screen shots out of order, this is the photo I wanted to create. I started with the shot below, an ISO6400 image deliberately underexposed so I could shoot at 1/125 second when the girls were bowling.


I worked with the brightness and colorfulness algorithm. Instead of colorfulness I could have chosen chroma or saturation. To quote wiki  "colorfulnesschroma, and saturation are related but distinct concepts referring to the perceived intensity of a specific colorColorfulness is the degree of difference between a color and grayChroma is the colorfulness relative to the brightness of another color that appears white under similar viewing conditions. Saturation is the colorfulness of a color relative to its own brightness.Perhaps there are technical advantages to using the other two choices, but I haven't found any yet.


After adjusting for exposure and white balance I did a curves adjustment on colorfulness to create a brightly saturated cake and table cloth along with neutral and slightly subdued skin tones. The dull slider made big changes, the neutral slider didn't do much. With the strong blues and purples in this image the pastel slider shifted the colors more than the saturation slider. When I switched from colorfulness to chroma or saturation the colors shifted slightly. In short with curves and the sliders  I could smoothly adjust the colors to just about anything I wanted. 

Pushing  matters further, with hue slider I could dress the girls in green without destroying the skin tones. 


Finally there is a set of adjustments to correct the differences between viewing an image on a monitor in a well lit room, on TV screen in a darker room or using a projector in a very dark room 

To sum up CIECAM02 is an excellent addition to RAWTherapee

Monday, February 20, 2012

Mistakes--Serendipitous

By Madison in Febuary standards last Saturday was balmy. Despite the sunny, mid 40's weather my D7000 and I spent the afternoon indoors at the Olbrich Garden photographing the Children of the Rain Forest.

This month's performers were the Hale O Malo Polynesian Dance Group, Their costumes and dances ranged from a New Zealand  Maori war dance to a Tahitian fertility dance. That invocation of human fertility came with a friendly warning, "Do not attempt this at home."


This image was shot during the pictures-with-the-kids session at the end of the show using my new Tamron 18 -270 mm f3.5-5.6 super zoom set at 18mm wide angle.  The manual exposure settings were f8 and 1/200 sec combined with an auto ISO. That ended up at 6400.

Not an optimum or necessary ISO for this image. It could have been much lower.  At 18mm the lens opens at f 3.5. For a static shot a shutter speed of 1/60 sec would have worked. But I had set up the camera for telephoto dance images, 1/200 sec to give a sense of motion without excessive blur and f8 to sharpen up the lens's slightly soft long end. I didn't spot any massive noise problems when I reviewied the screen shots during the shoot so I went with the default settings.

For post processing I downloaded RAW Therapee's latest 64 bit build, version 4.7.01. It doesn't have the new noise reduction routines yet, but it does have enough new features to  justify a build jump from 4.6 to 4.7.  I'll talk about a few newfeatures in this post, plus some older ones that I haven't used much, starting with the big review images in the file browser.

With dance groups I tend to over shoot.  You know, long continuous bursts hoping to capture that perfect combination of step, twirl and jump. This time I filled my 16 GB main card and moved down to my 8GB secondary card. There I found Miss Thumps-Up posing for Mom's perfect snap combined with an interesting environmental background.

Viewing the preview jpgs full size on my laptop screen while using the number and color coded ratings sped up my selection workflow. I ranked my 'maybe images' during a first pass and then fine tuning the selection set. Definitely a winner.

Judging by the curve of the molding board at the top, this image, shot at 18mm, has serious wide angle lens distortion.  So I tried the fix in the Transform/lensgeometry/distortion tab. My first guess, a -0.5 pincushion setting went way over the top. But it did open up ideas for some creative playing around later.


The for real setting was -0.09.  I pulled up a grid Guide Type to provide straight lines as a reference. At the moment the routine bends the image only one way and creates a curved blank area at the bottom. So I used auto fill to clean up that problem. And for those interested in composition rules the Guide Types include rule of thirds, rule of diagonals and several harmonic mean or, as I used to call them, golden sections.


With the proper settings I created an '18mm tamron' default profile that I can call up to automatically correct my wide angle images.

This fixed I tried out a  new profile that came with RT 4.7-- 'default ISO high'. After I applied the profile  it was  'WOW!! Where has all the ISO 6400 noise gone!!?'

Turns out the RT team had done some interesting things but the real WOW maker was my serendipitous mistake. I'd been working with the jpg not the NEF file, a jpg that had already gone through one pass of the Nikon D7000 excellent in-camera noise reduction routine.

I posted twice last August about how well RAW Therapee works as a jpg editor   My mistake turned up another use- one that is especially helpful to someone who shoots flash-less low light party and people photos.

Here is the most interesting settings in the 'default ISO high' profile along with my modifications.


I left the Impulse Noise Reduction at 80. Luminance comes up as 0 so I set that to 20. Gamma 1.2 has the effect of shifting noise reduction into the shadows where it is needed the most. As usual the effect of all this is to blur detail (bad) while removing noise (good).

The RT folk's ingenious addition is to use 'contrast by detail levels' to recover a surprising amount of the blurred detail. The default values are 0 (finest) =1.00 and the next level '1' =2.00 but at the time I was thinking noise rather than detail;  So I may have gone a little too far fiddling with the sliders and cut out slightly more detail than the noise reduction needed. Either way, the noise cleanup and preserved detail  on this ISO 6400 image is dramatic.

How dramatic. Here are my results. And unlike the Tahitian fertility dance you should definitely try this at home.


The image on the left is from the NEF using the current noise reduction routines. It has the highest noise. It also has the most preserved detail in the girl's hair so I could have pushed its noise reduction harder.  The middle image is the jpg from the D7000 using its default jpg (Sd) and noise reduction (norm) settings. While I wouldn't have called it bad a week ago, now it looks flat and washed out next to the RT image on the right. I lost some detail in the hair but with the noise now so low I can print it up large, perhaps to 11 by 14, without showing objectionable noise. Not shabby for an ISO 6400 image.

Lesson learnt. At the moment there is no advantage working from NEFs using RT. Not that this is a massive bash; the D7000 has one of the best in-camera noise reduction algorithms around. And judging from the comments in the forum, RT should get better soon. See Issue 1052: New luminance NR algorithm  http://code.google.com/p/rawtherapee/issues/detail?id=1052  for up to date details.

With a CPM member's show coming up and several low-light images I'm considering exhibiting, it is time for some serious post processing. Will let you know how everything works out.

PS. The line profiles were taken off the wall over the girl's shoulder.