Tuesday, March 29, 2011

D7000 noise- part 2

Quick question.  Which patch has the least amount of noise. The one with the line profile under the image? Or the one with the line profile beside the image?


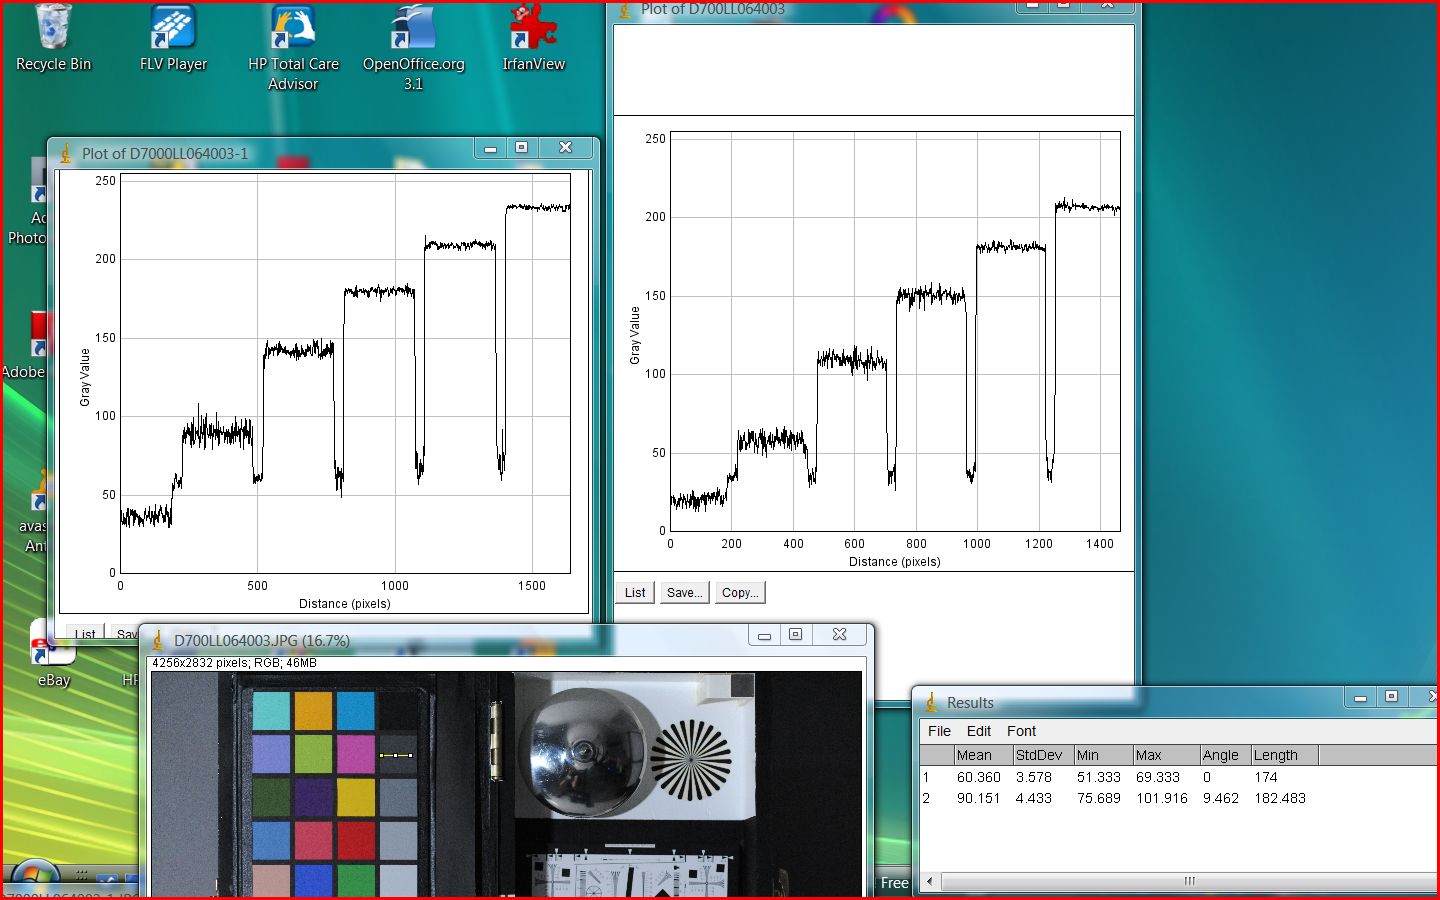
Actually nether. It's the same patch. In the bottom graph I measured 125 pixels. In the side graph I dragged the line out so I measured 1200 pixels.  Because ten times more noise wiggles were compress together the line is darker and looks noisier. This complicates things especially when comparing cameras with differing numbers of pixels.

From now on graphs are for info only.  I'll be posting result boxes showing the rms mean value (signal) and sdev (standard deviation or noise) Using these numbers I'll calculate the S/N numbers for any comparisons.

Yesterday I ate a few crow feathers in the D7000 thread. I'd blindly taken imaging-resource's word that they had measure the lighting for the D700 ISO6400 image. One look at the EXIF info and it was obvious that instead of  11 lumens, the lighting you find on a well lite street at night--the lighting used was more like 30 lumens.

My only excuse for such a stupid mistake is up to now I have been using my blog as an online lab notebook.  So I was free to changed my mine latter if I goofed.  After all nobody read my theoretical posts. Until this one caught peoples' attention. So my apologies for any confusion and on to what really is happening.


A way to correct for the lighting differences was to search out for areas in the images that had the same signal and then compare the noise. When I did it for the highlights, the black circled areas, it was definitely Oops.  The D700 beat out the D7000 by coincidentally 1.44--the magic noise number for a pixel twice bigger than the D7000's pixel.

Things become more interesting when I did the same thing for the shadows. I chose the second dark patch for the D700 (blue) and an area on the frame of the Dave Box for the D7000 (red).  The result box says it all.  Down in the shadows the S/N was identical.

I suddenly had some interesting ideas on what was going on, but since I was dealing with one set of suspect data, I certainly didn't have a convincing case. Even in my own mind.

Then d.brodsky posted a link to his images of the same scene, one taken with a D7000 and one with a D700. He provided a second data set.
(Click on the clips for full size and readable images)


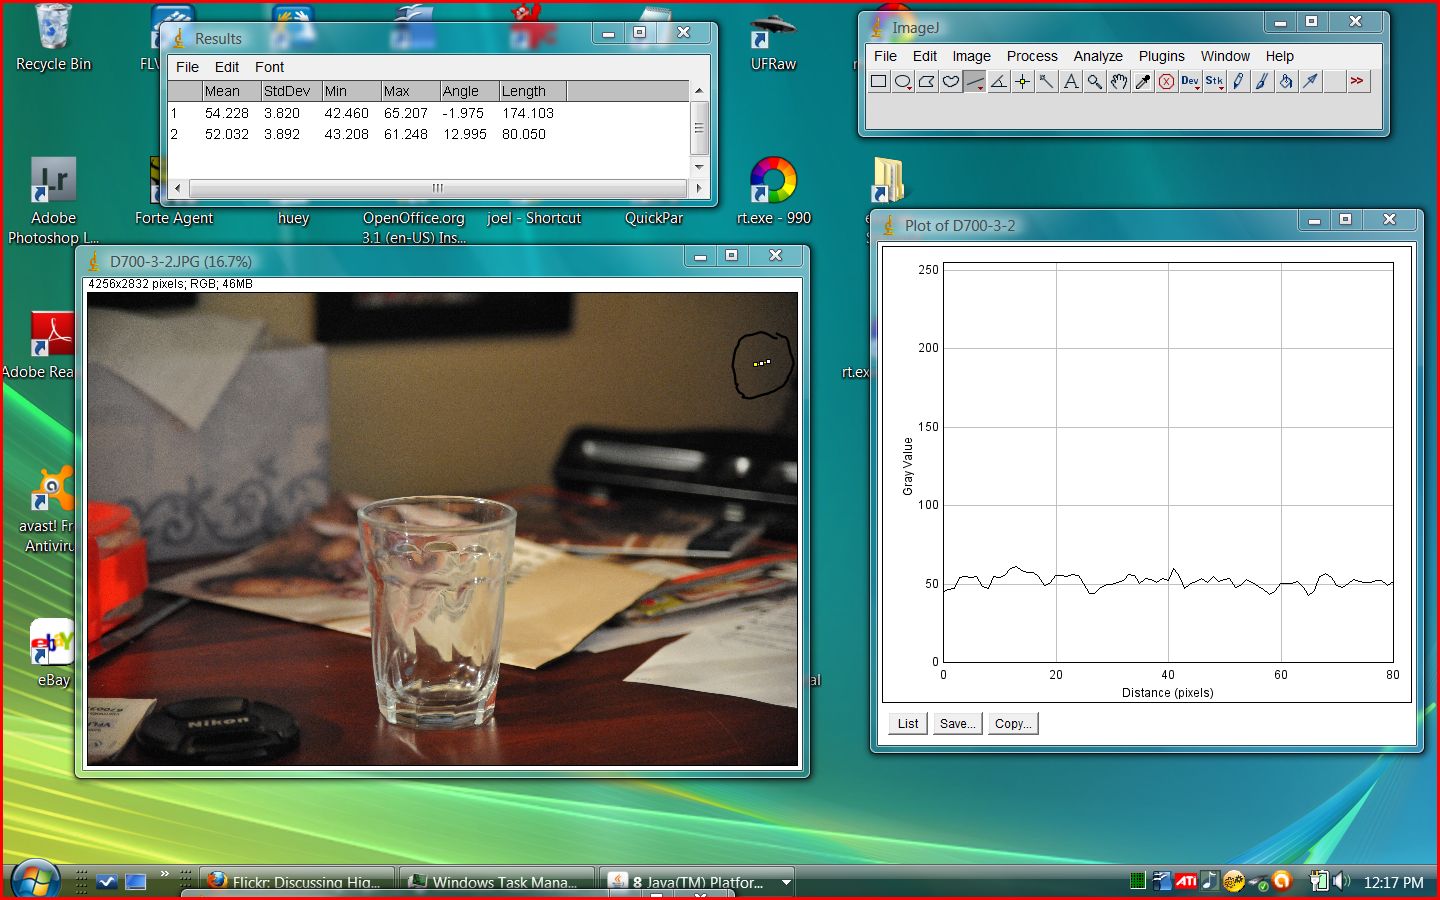
The EXIF info says the  images were taken with two different lens so the exposures weren't exactly identical but I did find areas where the signal values were close.  The result boxes show that with real world images the noise reduction in the two cameras can smooth the noise out to were the signal to noise is nearly identical.

So my current thinking that Nikon's noise reductions routines are sophisticated.  Besides the obvious settings-- off, low, normal and high-- the algorithm looks at the S/N in the various areas of the image.  If it is in a highlight were the S/N is high it uses little or no noise reduction. If it is the shadows it uses a lot.

So if you compare images by looking at the bright areas where the noise is easy to see, the pixel size difference is important. But if you are digging detail out of the shadows the two camera may give the same results.

My plans are to uses my D7000 to figure out what is going on. But it might be a while before I post again since the computer I'm working with is going back to the shop for warranty repairs. Who knows how long that will take.

And finally a special thanks to d.brodsky for sharing his images.

Monday, March 28, 2011

D7000-Best low light camera ever?

Edit  Learned a few things since I posted this. For the current thinking also see the next post: D7000 noise part 2

In a recent D7000 club post a low light handhold photographer wished he could afford the $2700 for a D700 body so he could take even lower light handhold photos. Since taking low light handheld photos is one of my things I became curious about how much better the full frame D700 is vs the cropped D7000. So I did some Internet research.

Everybody seems to go to dpreview nowadays but when it comes to comparing two camera's low light performance no review site beats imaging-resource. Why? Their Dave Box. They have been posting full size jpg images of that well designed target under pretty much the same lighting since 1995.  Combine it with ImageJ-free NIH image analysis software- and you have everything you need to separate the good low noise cameras from the bad. And with hardly any work.

An A/B comparison of the  d7000 vs the D700 Click on the image to see the full size screen clip.


What does the clip show? The smaller graph is the D7000. The larger is the D700 which I stretched out a little because it's actual ISO6400 is about 12% less than the D7000's 6400 ISO.  The noise profiles were taken on the five gray patches and show the RGB signal and noise. (See my Nov 2009 post 'Fun with ImageJ' for a procedure on how I did the measurement.)

Bottom line--save your money.  When it comes to ISO 6400 jpgs straight out of the camera with the default ISO noise reduction set to normal there isn't a nits bit of difference in the noise.

And if you want to really waste money go for a $9000 D3x. With that older design the 6400 ISO signal to noise is worse.


How do I defend my heresy--that big sensors aren't the greatest of the great.  With the jpgs that we print up or post the S/N is a combination of many factors. But with modern DSLR cameras the wavelet noise reduction in the firmware trumps them all.  The myth that big sensors are always less noisy is a hold over from the days before decent noise reduction routines. Even in the old day, the noise difference wasn't all that much. Double the sensor size with a big jump in price and you only end up with 40% less photon shot noise. (See my two Nov 2009 posts on noise for a fuller explanation.)

This is assuming the noise reduction is working.  When  you look at the S/N in the D3x white patch you might think that's super great except for the little spike at the beginning. Ain't true. When the noise reduction when on stage to do its strip-out-the-noise dance it got carried away. Went totally nude. What you are seeing is flat line with no detail.

Which brings up the fine art of marketing a camera.  The marketing folks try to send a sample camera to a review site as soon as possible so great reviews appear as the camera hits the stores.  And if the camera they send isn't quite ready for prime time? Who cares. Unless someone does measurements  that patch looks white and OK.

I assume the firmware was fixed before it hit the stores. Us ordinary folks might be fooled but a pro is going to notice and not put up with that sort of performance.

Here are the details.  The images I downloaded are found in the sample section of the camera review.  The lighting is supposed to be 1 foot candle or 11 lumens--they messed up a little in the D700 review.  Eleven lumens is what you find in a well lit city street at night. They also post a full series of shots where they cut the lighting back a stop at a time to show what you will see under worse conditions.

How accurate are the Imaging-resource images? Here are the measurements on a photo of a young rock hound I took a few days after I bought my D7000. ISO 6400 and NR normal. I've circled the areas where I took the noise profiles. If anything my camera maybe be slightly less noisy than the one used in the Imaging-resource review.

Edit- I forgot to explain the result box in the top photo.  If you look at the S/N in the D7000's second darkest patch you might say it's worse than the D700's S/N.  But when you calculate the rms S/N  (mean/sdev) the D7000's S/N is 20 and the D700's S/N is 17. A minor quirk of the measurement and not significant either way. After all we are dealing with random noise. 

Thursday, March 24, 2011

Chasing the best setting on a D7000

Still chasing after the best way to mate my $15 re-branded Sigma lens to my state of the DX art D7000.
After some Internet searching I discovered that bird photographers who know what they are doing use both the user1 and user2 setting on the D7000 mode dial. One setting for bird in flight (BIF) and one for bird posing prettily on a branch (BPPOAB since I don't know the official birder twitter abbreviation). If the bird takes off one quick turn of the mode ring gets you into the right settings.

One birder whose blog I forget since I didn't bookmark it listed his settings. Since he has the latest and greatest Nikon lenses with super fast lens motors and image stabilization they didn't work all that well with my fifteen year old lens. But they served as a starting point and I could modify them for  some success under some conditions.

The BIF settings for the geese images below are:
manual mode  1/1600 sec and f8
auto ISO (the variable for exposure) Max6400 but at 400 for the cloudy lighting
RAW plus jpg fine
Cl for 3 fps and 12-14 images is a burst with my class 6, 20mb/s, 16GB SanDisk memory card.
WB sunny (minor mistake)
Auto focus Continous with 21 focal points.

My wife and I had gone for a spring county ride with Goose Pond-- as it turned out still frozen over no birds--as a general destination. On the way and at the intersection of US51 and WI60 we found a partially flooded corn field with several hundred geese. I walked out in the mud, and collected geese image mainly walking away from me as I came too close. I waited around for about 30 minutes to the point where I know my wife was getting bored hoping some part of the flock would do something interesting.  Then with my usual perfect timing I started back to the car.

Part way back I heard the geese take off.  I missed the images of them getting ready but did catch some of them just above the ice. The lens locked in and I took a 25 plus series of well focused photos.  Four examples from the series below.  Click on the image for a larger version


All the images were converted using RAW Therapee. While not perfect the current alpha builds are stable enough for RT to become my converter of choice.

Bottom line--is everything great?  No. At times the lens/camera locks on to the background like in the first crow image in my last post. Even worse, the lens/camera can not lock at all and pulls back to the shortest focal distance. It sits there not trying to auto focus until I point the camera at something close. So things are not totally great but as I pointed out before the cost/performance ratio is very acceptable.

For my 'birds kindly posing' photos my setting are difference.  We were also looking for sandhill cranes on the day I took the geese photos.  I did see a pair at Schoeneberg Marsh but the pond was frozen over and they move out into it as I walked across the big open field beyond the parking lot.


While I did get a few focused 'landscape with birds' images I did learn that using any of the continues focus modes with my Promaster lens wasn't going to work. The birds might be posing nicely but this photographer wasn't rock steady.  Might have worked with an image stabilized lens but because of  camera shake the focus drifted all over the place.


Again with my sense of non-perfect photo timing, the photos I took the next day would have been far more interesting if I'd gone to Tiederman's pond first. There are two ponds within a couple blocks of each other. I was at the second shooting the crow sequence when two hikers came by and told me they had seen these cranes on the ice doing a mating dance. I hurried over but by then the cranes were all danced out.

I'd approached them slowly afraid to frighten them off.  Totally unnecessary.  A woman and her young daughter hiked by and I thought I'd give the daughter a treat by pointing out the cranes. Found out that this pair were permanent nesting season residents.  Last year they had hatched a  baby crane is this thicket but something got it. The baby crane before that was more lucky and grew up to fly south with its parents


With this photo I used the single servo focusing, the simplest mode on the D7000.  Set the focus box on the bird's eye, push down the focus/exposure level to look everything is, recompose in the viewfinder, and take the image. Worked quite well and I;m going to stick with it for focusing.

Do other stuff over again and I would have shot at f11 rather than f5.6 for a sharper image. But I did drag out all the detail there was to be had in this one using the Contrast by Detail feature in Raw Therapee. For this feature alone, every RAW photographer should have RT on her/his computer.

Click on the images below and view the original size to see how it brings out the feather detail on the bird's head.

With CbD enableded


With CbD disabled

Sunday, March 20, 2011

How a crow lands.

Info for a future reincarnation

At 10:28:04 and for several earlier images the camera has locked  in on the houses across the pond and the crow is totally out of focus


At 10:28:06 the crow flies by me. Since I am standing on a bank and bird is now below me it's silhouetted against the ice. The camera locks in on the bird.


At 10:28:06+ the crow spreads its wings and tail feathers for drag to slow down and to raise itself vertical. I am pivoting and it is also turning towards me. I now can take a near face on image.


At10:28:08- the crow has moved beyond the tall reed in the previous image and is on the ground with its tail feathers tucked in but with its wings still spread.


At 10:28:08+ the crow has tucked all its feathers back into place


And at 10:28:14 after another routine landing the crow strolls away.

Wednesday, March 2, 2011

Fixing It

{To see large in a separate window click on any image}

Yup, I messed up.  The white balance was set for indoor shots, not bright sunlight. But since I was shooting RAW+JPG the image could be salvaged using RAW Therapee.

That converter is a few more change sets from becoming a beta release. Beta release means the developers believe they've fixed all the bugs on their to-do list. And with change-set 990 they have come close. So, with the features and interface now frozen, I'll be blogging about all you and I can do with this brilliant new program.


The first pass with the WB eyedropper got me here. While it still has a blue color cast the big problem is the shadow of the tree on the ice--the feature that caught my eye--is now washed out. Since I wanted the shadow to be the subject of the photo I have to find a way to make it stand out more.


Upping the contrast darkened the shadow and lightened the ice but it also changed the appearance of the rest of the photo.  Not a good fix.


So I went to a feature which as far as I know is not found in other RAW converter--LAB curves. The LAB working space, like the RGB working space, has three channels. L (the b&w luminosity), A( the tonal range from intense red to its complementary color intense green) and B (the similar tonal range from intense blue to its complementary color intense yellow)

If that one paragraph explanation left you confused, never mind.  The important thing is that I could apply a tone curve to the L channel like I've shown. 

This is not possible in PS Element or any other moderately inexpensive converters. Spend a $1000 or so for Photoshop, and you could convert the RAW file in ACR, import it to Photoshop, change the mode from RGB to LAB, turn the L channel into an B&W image, apply a curve layer to that image, and finally figure out how to replace the original L channel with the new image so you can convert everything back to RGB and save your file as a JPG.

Or you can download free RAW Therapee and scroll down to the bottom of the exposure tab where everything you need is a few mouse clicks away. 


This is what I was after.  Generated by the new tone curve plus the brightness, contrast and saturation slider adjustments.  This should also give you an sense of why I'm so excited about RAW Therapee. Everything took half the time I just spent writing these last four sentences.