Saturday, March 30, 2013

The Artist Hidden Within

I'm taking a master class on how to drag the 'artist hidden within' out into the daylight. So for the next several weeks that hidden artist will be raising his sarky head and inflicting his 'masterpieces' upon the innocent blogosphere.

As any regular reader of this blog knows, the non hidden artist's aesthetic tends towards photographic perfection, the sort you pixel peek at 100% or higher to see. Accurate colors, perfect sharpness, noise freedom has reigned here.

The hidden artist, on the other hand, favors this.


The original Playboy style image that posed for the 'artist within' is from a 40 year old Petersen's Master of Contemporary Photography book about Bert Stern.  If the name Bert Stern isn't instantaneously recognizable  he's the photographer whose 1950's ads turned vodka, then a cold war Russian commie pinko exotic, into an all American drink. This really dry vodka martini ad was worth $4000 plus travel expenses in 1955 bucks. If his reputation has slipped a little since then he lived very well in his time.


Enough dry history. Here is the 'hidden artist's' RT workflow.

First select a colorful page or double page image to mangle. Set the camera to manual, to ISO100 or lower, to between 2 to 10 sec exposure and to whatever iris opening gives a reasonable photo. Move camera while snapping the photo. Better yet, twist, roll and yaw the photographer while snapping  the photo. Since you will have no idea what you have on the card, do this a dozen or more times. Load  the most interesting photo into RAWTherapee. Or in this case, one that didn't violate Blogspot's prohibition of full frontal nudity. Finally start the masterpiece making.


This brought out the color in the wide tie, the subject of the photo.


A hue slider adjustment that shifted the colors towards green. The CIECAM02 algorithm is 'all'.


Playing around with the CIECAM02 sliders brought us to this color mixture.


Since the colors aren't changing much 'the artist within'  turned this into a tiff file. Then he loaded that back into RT for further processing.


This lighten the background.


With this 'the artist within' laid down his mouse.  And left it to 'the outer guy' to write this blog post. He liked this version the best.


RAWTherapee 4.0.10.36 is now here. Besides speedups and bug fixes, it offers a new set of packaged profiles and two new demosaicing algorithms intended  for use with HighISO images. (Big Grin)

http://www.visualbakery.com/RawTherapee/Downloads.aspx

Monday, March 25, 2013

Creating Noise Profiles

I was asked what I use to create noise profiles. It is ImageJ'  a free cross platform Java app from NIH.  The best and ad free download site is from NIH-- http://rsbweb.nih.gov/ij/download.html

Once you have it installed  open your photo and choose your line type. Drag it across  the area of your photo where you want to measure noise.  Cntrl+K creates the graph.


To  change the Y scale of the graph go to edit, options, plot profile options


For  my measurement in the black area of this poster I picked  min 0, max 40


Once you have a flat noise profile, go to analyse, measure or hit Cntrl+M

For an accurate noise measurement signal average several. This is a square law thing so 4 measurements doubles your accuracy and 9 measurements triples it. Summarize will do the math where your Signal to Noise (S/N) is the Mean divided by the StdDev (Standard Deviation)


Is this conventional statistical definition of S/N to best way to characterize photographic signal to noise?Probably not.  Noise peaks, especially colored noise peaks, that jump out of the average noise are far more distracting than a mild increase in the average noise. So is pattern noise.  Both these noise problems will become lost in these numbers. But if you do these comparisons carefully ImageJ is a very useful tool for working out how well the various combinations of sliders and methods work for you.

Final note.  You can not save a picture of your graph directly in ImageJ. 'Save as' creates a spread sheet file, 'Clear\' clears out you mistakes and 'Rename' allows you to start a new results list without losing your previous numbers.

Again if you want to know more about noise read Emil's article,  http://theory.uchicago.edu/~ejm/pix/20d/tests/noise/noise-p2.html


Saturday, March 23, 2013

Shoot at ISO21000--Print at 30 by 45 inches

Sounds insane.  ISO21000 noise. Huge print size.  Welcome to the world of RAWTherapee noise reduction.


Rhianna is letting the world know she just bowled a strike.


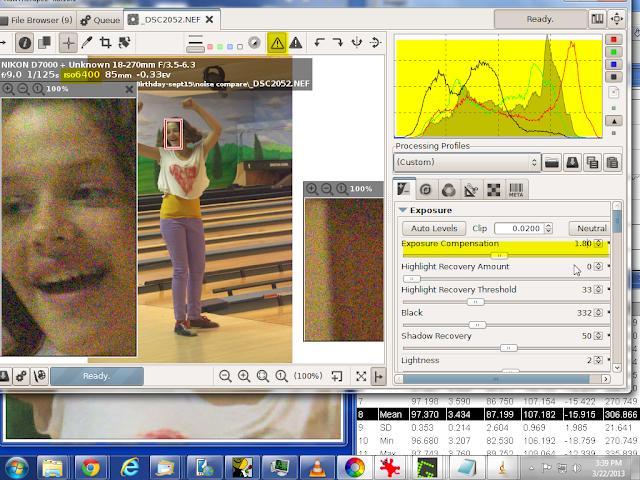
The gory photo details. The camera was set to ISO6400-- which is just a conventional way of saying the D7000's sensor's true and only ISO100 signal is preamp boosted  by a factor of 64 before it enters the A/D.    Since the photo had to be boosted again by an exposure compensation of 1.8EV to shift the red histogram I multiplied the camera's ISO by 3.24 (1.8 squared)  to get a correct noise IS0 of 21000.

Ain't a cheating fudge factor. That's how sensor physics works.

Now the triumph of  RT noise reduction. But first here is what not to do.


I set the exposure compensation correctly before I went to the CIECAM02 tools to improve the color, contrast and lightness. But I forgot to return to exposure to readjust the histograms  When I caught my mistake, I checked the red color channel ( box at top) for blooming (red areas).  Because I liked my CIECAM02 fine tunings,  only one channel was effected  and the blooming area areas weren't in any critical part of the image (see http://scribble-jpc.blogspot.com/2013/02/rescuing-really-important-snapshots.html ) I decided to go with my mistake. After all I was getting a WOW Signal to Noise of 20!


Wrong move.  After wasting a bunch of time and discovering a few nagging inconsistencies  I corrected the exposure comp.  One measurement later and I discoverer the real double WOW WOW S/N was to be 28!!

A few points on experimental techniques. I took the noise line profile off Jilly's arm because that area has constant color--the curves are flat-- and the arm is close to the center of the tonal range--95 in a range of 0-255. These curves have to come out flat or don't bother doing the extra work to come up with a numerical signal to noise.  You will be measuring bumps and slopes.  Not the noise.

Looking more closely I should have shortened the length of the line profile of the last measurement  to get rid of the bump at the beginning. That error added about 0.5-1 to the last StdDev (standard deviation) number.  That's why I averaged 7 measurements to clean up these errors. Even without these moments of carelessness, remember we are dealing with noise. Three measurement are a minimum, 7 to 9 are better and a 100 measurements  would be an insane overkill.  We are doing a square law experiment and the Law of Diminishing Returns kicks in with the second measurment

Plus what's so wow about a S/N of 28. Why not 280 or even 2800. If you got  the bucks to buy the camera, like the Hubble Space Telescope or the Kepler Cosmic Background Radiation Telescope in the news recently, you can go for those high S/N ratios.  But for the rest of us, with this image taken under these exposure conditions, a S/N of 28 does equal a 30X45 poster pined to a bedroom wall.


With modern tech we can pixel-peep (and complain about what we see) far too easily. Rhianna's face is 8 inches wide on my super calibrated monitor (something that the world can't see --- for the complaint  http://scribble-jpc.blogspot.com/2013/02/in-search-of-perfect-eyeball-monitor.html ) . It is 3 inches on a 11 by 14 print I had made using the older 4.0.9.185 noise reduction.  Do the math and this is what you will see on a 30 X 45 inch wall poster.


That  print had a S/N of ~15.  If you were looking for noise there was a hint of it on Rhianna's face and in the brown area under the big number one in the background. But it's nothing that jumps out at you. I sure Rianna's mom won't complain when I give her the print next time I'm over in her part of the city.

EDIT--If you looked at this post before you might notice that Jilly has suddenly morphed into Rhianna.
Rhianna is Jilly's stepsister. They both live across the street from Charlotte. I got their names mixed up. Sorry girls. :-(

After I posted this I remember I do have a big display my flat screen LCD TV with its port in the side for usb sticks and memory cards.  When I displayed this image big it looked just like I said it would from my calculations.


The details from the pp3. I started with the HighISO profile. The exposure  comp of 0.88 I set. I may have fiddled with that other setting. Or they may have come with the profile.


[Exposure]
Auto=false
Clip=0.02
Compensation=0.88
Brightness=2
Contrast=22
Saturation=5
Black=332
HighlightCompr=0
HighlightComprThreshold=33
ShadowCompr=50
CurveMode=Standard
CurveMode2=Standard
Curve=0;
Curve2=0;

The image needed some sharpening. Except for 'only edges' the setting are the defaults. If it wasn't for the 'only edges' algorithm I never would have dared using sharpening on a high noise image.

[Sharpening]
Enabled=true
Method=usm
Radius=0.5
Amount=125
Threshold=20;80;2000;1200;
OnlyEdges=true
EdgedetectionRadius=1.8999999999999999
EdgeTolerance=1800
HalocontrolEnabled=false
HalocontrolAmount=85
DeconvRadius=0.75
DeconvAmount=75
DeconvDamping=20
DeconvIterations=30

White balance off Jilly's shirt

[White Balance]
Setting=Custom
Temperature=3058
Green=0.80500000000000005

The color and appearance fine tuning

[Color appearance]
Enabled=true
Degree=100
AutoDegree=true
Surround=Average
AdaptLum=16
Model=RawT
Algorithm=JC
J-Light=27.100000000000001
Q-Bright=-1
C-Chroma=-5
S-Chroma=0
M-Chroma=0
J-Contrast=44.5
Q-Contrast=64.5
H-Hue=0

The HighIso defaults. I could have fiddled with them for a better S/N but why bother. My 30 inch printer-imaginary- is out of ink-imaginary- and will stay that way given the cost of feeding a real printer. For five bucks and change I can get a 12 by 18 inch print from my local Woodmans-one that matches the image on my screen. As long as I switch the room lights back ovet to 5000K spots. Perfect color management ain't easy.

[Directional Pyramid Denoising]
Enabled=true
Luma=50
Ldetail=50
Chroma=50.689999999999998
Method=Lab
Redchro=0
Bluechro=0
Gamma=1.7


Find RAWTherapee  4.0.11.1 here
http://www.visualbakery.com/RawTherapee/Downloads.aspx

For an excellent tutorial on noise by Emil, the guru behind RT's new noise reduction systen
 http://theory.uchicago.edu/~ejm/pix/20d/tests/noise/noise-p2.html


Friday, March 8, 2013

It's Here!! RAWTherapee 4.0.10


No Noise Reduction


The new LAB noise reduction with its speed ups and individual noise channel controls.

Need I say anything more?  Yup. Great job RT folks!!

Find RAWTherapee  4.0.10.1 here

http://www.visualbakery.com/RawTherapee/Downloads.aspx

Thursday, March 7, 2013

Kindergarten Snow Day---Another Quickie Workflow


The history of this less than impressive image started with flickr mail about non CPU manual lenses. I had accumulated a collection from garage sales, Craig's lists and on-line non ebay auction sites back when I was shooting with a Nikon D60. One lens was an Osawa 300mm f5.5. 

If I remember right curiosity drove that purchase.  Osawa?  Never heard the name. What kind of lens was that?  Osawa turned out to be a short lived 35mm camera maker from the 1970's. But a decent lens maker who, last time I googled, was still making lens for medium format cameras.

The lens did not disappoint and became part of my D60 kit. I posted some shots on flickr but when I bought the D7000 the lens was packed away and eventually buried under other boxes of good junk being sorted. Wife has ordered what threatens to turn into a massive Spring cleaning.  So when I received the email from another Nikon lens collector asking how it worked on a D7000, I had to find it. Which delayed any lens testing to the day of the latest Midwest mini-blizzard. 

The test target was house a hundred yards away from an upstairs bedroom window. The test was: yes the Osawa mounted and yes it took pictures. The fact that kids enjoying a snow day from kindergarten  wandered into the image part of frame and a hunk of out of focus curtain half filled the rest was coincidental. That the image ended up on my computer along with a directory full of more important shots was equally coincidental. That it wasn't immediately stripped down to loose pixels and tossed away into the reject bucket wasn't coincidental.

Recently I've been reading about photographic history and aesthetics.  The super sharp, noise free, tonally perfect aesthetic embraced by most of us RT users--why else would we put up with this many check boxes and sliders and even demand more -- can be traced back to photographers like Ansel Adams and Edward Weston. Both spent inordinate amount of time and effort in the darkroom producing perfect prints. But there were other aesthetics: the pictorialism of Stieglitz's Camera Works, the abstractions of Minor White's early Aperture, the photo montages of Rodchenko revolutionary posters--and so on.

 Let's call this an example of  Scribble's ...Colorism.


An auto levels exposure correction. If I had wanted to go for an Ansel Adams Zone System tonality I would use the black point slider to expand the histogram to fill the empty left section.


As good a time as any to crop. Since a square frame worked I fixed the ratio and invoked the rule of thirds. The big difference in the histogram came from cropping out the curtain.


A white balance in a snow scene is always a good idea even though in this image it didn't make much of a difference.


Now the Colorism created with CIECAM02.  The Contrast (up) and Brightness (down)  moved the snow into the unclipped but close to pure white area of the histogram.  The Colorfulness slider fully colorized our models, human and canine, and gave the image its snap.


Now a mini confession. My first workflow wasn't as quick and clean as this tutorials claims. I played around with slider and curve combinations, made a bunch of jpgs, sent one off to flickr and even collected a comment among the views. Wasn't til the end of the mini-blizzard and the snow blowing was over that I decided this might be worth a tutorial. So I duplicated the settings from memory.  And ended up liking my first version better.

A hint. If you ever need to duplicate an image or workflow and find yourself mentally kicking yourself  for not saving a profile, load the pp3 file of your good jpg into notepad and duplicate the settings. That will usually get you back to where you've been before.

Not my usual image but --sometimes you have to go wild and live dangerously.